
3.1文件I/O概述
Linux操作系统是基于文件概念的。文件是以字符序列构成的信息载体。根据这一点,可以把I/O设备当做文件来处理,因此,在磁盘上的普通文件进行交互所用的统一系统调用可以直接用于I/O设备。这样大大简化了系统对于不同设备的处理,提高了效率。Linux中的文件主要分为6种:普通文件、目录文件、符号链接文件、管道文件、套接字文件和设备文件。
那么,内核如何区分和引用特定的文件呢?这里用到了一个重要的概念——文件描述符。对于Linux而言,所有的设备和文件的操作都是通过文件描述符来进行的。文件描述符是一个非负的整数,它是一个索引值,并指向在内核中每个进程打开文件的记录表。当打开一个现存文件或创建一个新文件时,内核就向进程返回一个文件描述符;读写文件时,需要把文件描述符作为参数传递给相应的函数。
在Linux中,所有打开的文件都对应一个文件描述符。文件描述符的本质就是一个非负数。当打开一个时,该整数由系统分配。文件描述符的范围是0-OPEN_MAX。早期的Unix版本的OPEN_MAX=19,即允许没个进程同时打开20个文件,现在很多系统则将其增加至1024个。
通常,一个进程启动时,都会打开3个流:标准输入、标准输出和标准错误。这3个流分别对应文件描述符0、1 和 2(对应的宏分别是STDIN_FILENO、STDOUT_FILENO和STDERR_FILENO)。
基于文件描述符的I/O操作虽然不能直接移植到类Linux以外的系统上去(如Windows),但它往往是实现某些I/O操作的唯一途径,如Linux中底层文件操作函数、多路I/O、TCP/IP套接字编程接口等。同时,他们也很好地兼容POSIX标准,因此,可以很方便地移植到任何POSIX平台上。基于文件描述符的I/O操作是Linux中最常用的操作之一。
文件I/O相关函数:open() 、read() 、write() 、lseek() 和close() 。这些函数的特点是不带缓冲,直接对文件(包括设备)进行读写操作。这些函数不是ANSI C的组成部分,而是POSIX相关标准来定义。
3.2文件I/O操作
3.2.1文件打开与和关闭
open()函数用于创建或打开文件,在打开或创建文件时可以指定文件打开方式及文件的访问权限。
| 所需头文件 | #include <sys/types.h> #include<sys/stat.h> #include |
|---|---|
| 函数原型 | int open(const char pathname, int flags); int open(const char pathname, int flags, mode_t mode); |
| 函数参数 | pathname: 被打开的文件名(可包括路径名) flags(文件打开方式,这里介绍几个常用的) O_RDONLY 只读 O_WRONLY 只写 O_RDWR 可读可写 O_CREAT 如果文件不存在,就创建一个新文件,并用第三个参数为其设置权限; O_TRUNC 若文件已经存在,那么会删除文件中的全部原有数据,并且设置文件大小为0; O_APPEND 以添加方式打开文件,在写文件时,文件读写文职自动指向文件的末尾,即将写入的数据添加到文件的末尾; mode :新建文件的存取权限 |
| 函数返回值 | 成功:返回文件描述符 失败:-1 |
close()函数用于关闭一个被打开的文件。当一个进程终止时,所有打开的文件都有内核自动关闭。很多程序都利用这一特性而不显示地关闭一个文件。
| 所需头文件 | #include |
|---|---|
| 函数原型 | int close(int fd); |
| 函数参数 | fd:文件描述符 |
| 函数返回值 | 成功:0 失败:-1 |
3.2.2文件读写
read()函数从文件中读取数据存放到缓冲区中,并返回实际读取的字节数。若返回0,则表示没有数据可读,即已达到文件尾。读操作从文件的当前读写位置开始读取数据,当前读写位置自动往后移动。
| 所需头文件 | #include |
|---|---|
| 函数原型 | ssize_t read(int fd, void *buf, size_t count); |
| 函数参数 | fd :文件描述符; buf :指定存储器读取数据的缓冲区; count :指定读出的字节数; |
| 函数返回值 | 成功:读到的字节数; 0:已到达文件尾; 1:出错; |
在读到普通文件时,若读到要求的字节数之前已到达问价你的尾部,则返回的字节数会小于指定读出的字节数;
write()函数将数据写入文件中,并返回实际写入的字节数。写操作从文件的当前读写位置开始写入。对磁盘文件进行写操作时,若磁盘已满,write()函数返回失败;
| 所需头文件 | #include |
|---|---|
| 函数原型 | ssize_t write(int fd, const void *buf, size_t count); |
| 函数参数 | fd :文件描述符; buf :指定存储器写入数据的缓冲区; count :指定读出的字节数; |
| 函数返回值 | 成功:写入的字节数; -1:出错; |
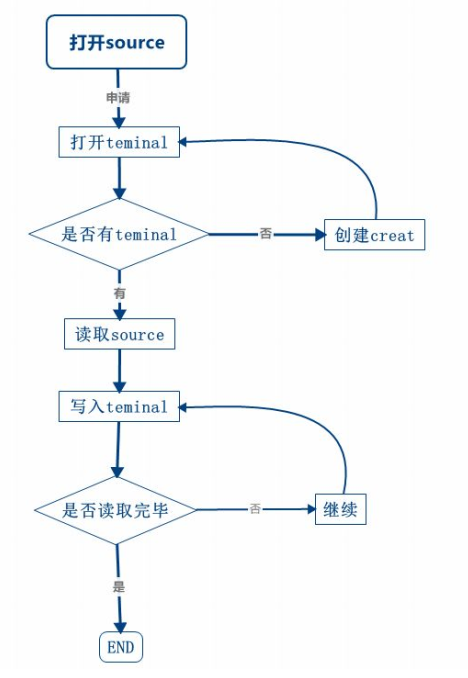
下面写个简单小程序,实现copy程序,完成文件的复制,关于实例的流程如下所示。
代码如下:
#include <stdio.h>
#include <unistd.h>
#include <sys/types.h>
#include <fcntl.h>
#include <sys/stat.h>
#define maxsize 256
int main(int argc, char *argv[])
{
    int fd1,fd2;
    int byte;
    char buffer[maxsize];
    if(argc != 3)
    {
        printf("command error!\n");
        return -1;
    }
    if((fd1 = open(argv[1],O_RDONLY)) == -1)
    {
            perror("open fails");
            return -1;
    }
    //如果文件不存在,则创建,若存在,则覆盖;
    if((fd2 = open(argv[2],O_WRONLY | O_CREAT | O_TRUNC ,0664)) == -1)
    {
        perror("open fails");
        return -1;
    }
    while(1)
    {
        if((byte = read(fd1,buffer,maxsize)) > 0)
            write(fd2,buffer,byte);
            if(byte == 0)
                    break; //如果读不到数据,则返回
    }
    close(fd1);
    close(fd2);
    return 0;
}
执行结果如下:
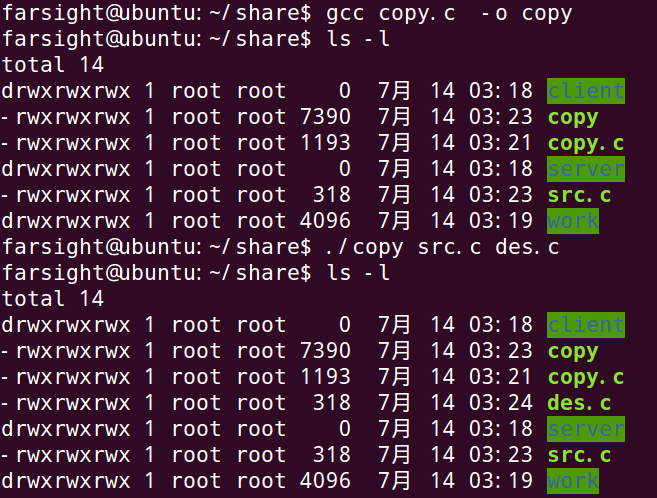
我们可以看到,原来file2.c并不存在,执行完程序后,file2.c存在,且大小和file1.c相同。
3.2.3文件定位
lseek()函数对文件当前读写位置进行定位。它只能对可定位(可随机访问)文件操作。管道、套接字和大部分字符设备文件不支持此类操作;
| 所需头文件 | #include <sys/types.h> #include |
|---|---|
| 函数原型 | off_t lseek(int fd, off_t offset, int whence); |
| 函数参数 | fd :文件描述符 offset :相对于基准点whence 的偏移量。以字节为单位,正数表示向前移动,负数表示向后移动 whence :当前位置的基点 SEEK_SET:文件的起始位置 SEEK_CUR:文件当前读写位置 SEEK_END:文件的结束位置 |
| 函数返回值 | 成功:文件当前读写位置 -1:出错 |
我们可以通过lseek函数实现一个小功能:查看文件的大小,代码如下:
#include <stdio.h>
#include <unistd.h>
#include <fcntl.h>
#include <sys/stat.h>
#include <sys/types.h>
int main(int argc, const char *argv[])
{
    int fd;
    int length;
    if(argc != 2)
    {
        printf("command error!\n");
        return -1;
    }
    if((fd = open(argv[1],O_RDONLY)) == -1)
    {
        perror("open fails");
        return -1;
    }
    length = lseek(fd,0,SEEK_END);
    printf("The length of %s is %d bytes!\n",argv[1],length);
    return 0;
}
执行结果如下:
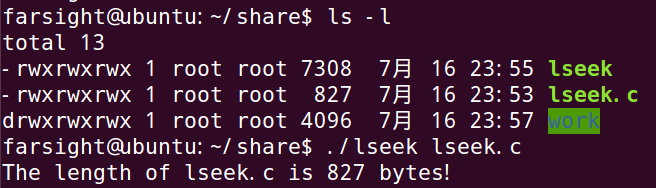
我们可以看到,得到了lseek.c正确大小!
3.3文件与目录
3.3.1文件信息
前前在讲解文件基础的时候对文件的属性做了详细的安介绍,我们通过ls命令查看到的文件信息,也可以使用stat函数组提取出来。
我们首先使用命令来查看吧,通过前面的内容我们知道,一个文件对应一个索引号inode,inode是文件系统提供的唯一数值编址,这个数值叫inode编号(索引号),我们通过使用命令"ls -i""ls -al""ls -ail"可以查看索引号等元数据。

【注1】发现sys和proc的inode(1)是相同的,也就说明了,只在磁盘上存了一份。
【注2】-i表示查看索引信息,-a表示查看所有,-l表示显示每个文件的详细信息。
接下来我们通过stat函数组来取得指定文件的文件属性,文件属性存储在结构体stat里。首先看看stat 结构体:
struct stat {
    dev_t     st_dev;         /* ID of device containing file */
    ino_t     st_ino;         /* inode number */
    mode_t    st_mode;        /* protection */
    nlink_t   st_nlink;       /* number of hard links */
    uid_t     st_uid;         /* user ID of owner */
    gid_t     st_gid;         /* group ID of owner */
    dev_t     st_rdev;        /* device ID (if special file) */
    off_t     st_size;        /* total size, in bytes */
    blksize_t st_blksize;     /* blocksize for filesystem I/O */
    blkcnt_t  st_blocks;      /* number of 512B blocks allocated */

    /* Since Linux 2.6, the kernel supports nanosecond
    precision for the following timestamp fields.
    For the details before Linux 2.6, see NOTES. */

    struct timespec st_atim;  /* time of last access */
    struct timespec st_mtim;  /* time of last modification */
    struct timespec st_ctim;  /* time of last status change */

    #define st_atime st_atim.tv_sec      /* Backward compatibility */
    #define st_mtime st_mtim.tv_sec
    #define st_ctime st_ctim.tv_sec
};
stat函数组有如下函数:
int stat(const char *path, struct stat *statbuf);
int fstat(int fd, struct stat *statbuf);
int lstat(const char *path, struct stat *statbuf);| 所需头文件 | #include <sys/types.h> #include <sys/stat.h> #include |
|---|---|
| 函数原型 | int stat(const char path, struct stat statbuf); |
| 函数参数 | pathname:文件路径 buf:文件信息 |
| 函数返回值 | 0:成功 -1:出错 |
| 所需头文件 | #include <sys/types.h> #include <sys/stat.h> #include |
|---|---|
| 函数原型 | int fstat(int fd, struct stat *statbuf); |
| 函数参数 | fd :文件描述符 *buf:文件信息 |
| 函数返回值 | 0:成功 -1:出错 |
| 所需头文件 | #include <sys/types.h> #include <sys/stat.h> #include |
|---|---|
| 函数原型 | int lstat(const char path, struct stat statbuf); |
| 函数参数 | path:文件路径 buf:返回文件的信息,针对符号链接,lstat 返回链接本身,而不是而非目标文件 |
| 函数返回值 | 0:成功 -1:出错 |
看个例子吧。
#include <stdio.h>
#include <string.h>
#include <unistd.h>
#include <fcntl.h>
#include <stdio.h>
#include <sys/types.h>
#include <sys/stat.h>
#include <unistd.h>
#include <fcntl.h>

int main(int argc,char *argv[])
{
    struct stat groupstat;
    int fd,ret;

    if(argc <2)
    {
        printf("\nPlease input file path\n");
        return 1;
    }

    //stat函数测试
    ret = stat(argv[1],&groupstat);
    if(ret)
    {
        printf("Please make sure file path\n");
        return 1;
    }
    printf("stat function test , %s of st_ino inode is %ld\n",argv[1],groupstat.st_ino);

    //fstat函数测试
    fd = open(argv[1],O_RDWR|O_NOCTTY|O_NDELAY);
    if(fd<0)
    {
        printf("Please make sure file path\n");
        return 1;
    }
    ret = fstat(fd,&groupstat);
    if(ret){
        printf("Please make sure file path\n");
        return 1;
    }
    printf("fstat function test , %s of st_ino inode is %ld\n",argv[1],groupstat.st_ino);

    //lstat函数测试
    ret = lstat(argv[1],&groupstat);
    if(ret)
    {
        printf("Please make sure file path\n");
        return 1;
    }
    printf("lstat function test , %s of st_ino inode is %ld\n",argv[1],groupstat.st_ino);
    return 0;
}
结果如下所示。

我们通过命令查看是否一致呢?

不管用那种方式,都能提取文件的索引号。
3.3.2文件权限
文件的权限我们通过ls查看,使用chmod可以修改文件的权限。关于chmod我们再Linux基础我们已经详细说明了,接下来我们要是用的是chmod函数组。
| 所需头文件 | #include <sys/stat.h> |
|---|---|
| 函数原型 | int chmod(const char *path, mode_t mode); |
| 函数参数 | *path:文件路径。 mode:直接使用数字即可。和前面命令中chmod 777 xxx 中的777 这个参数含义类似,也可用组合值。 |
| 函数返回值 | 0:成功 -1:出错 |
| 所需头文件 | #include <sys/stat.h> |
|---|---|
| 函数原型 | int fchmod(int fd, mode_t mode) |
| 函数参数 | fd:文件描述符。 mode:直接使用数字即可。和前面命令中chmod 777 xxx 中的777 这个参数含义类似,也可以用组合值 |
| 函数返回值 | 0:成功 -1:出错 |
#include <stdio.h>
#include <sys/types.h>
#include <sys/stat.h>
#include <fcntl.h>

int main(int argc,char *argv[])
{
    int fd,ret;

    if(argc <3){
        printf("\nPlease input file path\n");
        return 1;
    }

    //chmod函数测试
    ret = chmod(argv[1],0777);
    if(ret<0){
        printf("Please make sure file path\n");
        return 1;
    }
    printf("chmod %s 0777 is success!\n",argv[1]);

    //fchmod函数测试
    fd = open(argv[2],O_RDWR|O_NOCTTY|O_NDELAY);
    if(fd<0)
    {
        printf("Please make sure file path\n");
        return 1;
    }
    ret = fchmod(fd,0555);
    if(ret<0)
    {
        printf("Please make sure file path\n");
        return 1;
    }
    printf("fchmod %s 0555 is success!\n",argv[1]);

    return 0;
}
结果如下所示:
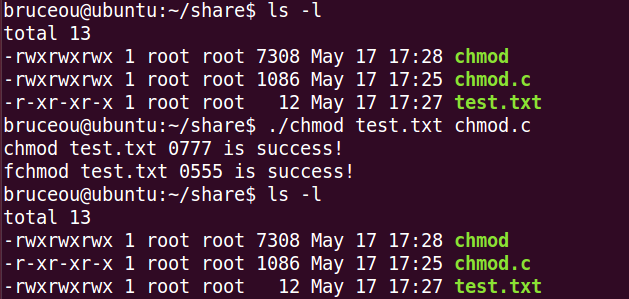
我们可以发现文件的权限被修改了。
3.3.3创建与删除目录
创建目录
Linux命令中可以使用mkdir创建目录,系统编程中可以通过mkdir创建目录,这里我们使用mkdir函数创建目录。
| 所需头文件 | #include <sys/stat.h> #include <sys/types.h> |
|---|---|
| 函数原型 | int mkdir(const char *pathname, mode_t mode); |
| 函数参数 | pathname:文件路径 mode:直接使用数字即可。和前面命令中chmod 777 xxx 中的777 这个参数含义类似,也可以使用组合值。 |
| 函数返回值 | 成功返回0 错误返回-1 |
#include <stdio.h>
#include <sys/stat.h>
#include <sys/types.h>

int main(int argc,char *argv[])
{
    int ret;

    //检测参数
    if(argc <2){
        printf("\nPlease input file path\n");
        return 1;
    }

    //使用mkdir函数新建目录
    ret = mkdir(argv[1],0777);
    if(ret<0)
    {
        printf("mkdir %s failed!\n",argv[1]);
        return 1;
    }
    printf("mkdir %s suceces!\n",argv[1]);

    return 0;
}
结果如下所示:

删除目录
Linux命令中可以使用rmdir删除目录,系统编程中可以通过rmdir删除目录。
| 所需头文件 | #include |
|---|---|
| 函数原型 | int rmdir(const char *pathname); |
| 函数参数 | pathname:文件和目录的路径 |
| 函数返回值 | 成功返回0 错误返回-1 |
#include <stdio.h>
#include <unistd.h>
int main(int argc,char *argv[])
{
int ret;
//检测参数
if(argc <2)
{
printf("\nPlease input file path\n");
return 1;
}
//使用rmdir函数删除目录
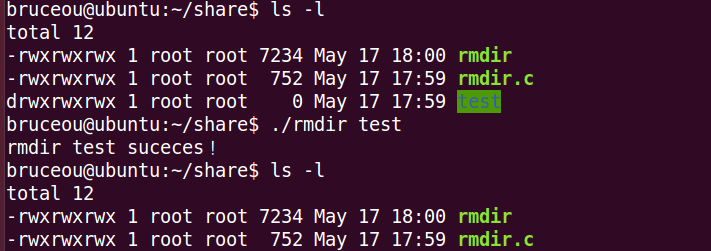
ret = rmdir(argv[1]);
if(ret<0)
{
printf("rmdir %s failed!\n",argv[1]);
return 1;
}
printf("rmdir %s suceces!\n",argv[1]);
return 0;
}结果如下所示:
3.3.4获取当前目录及目录切换
获取当前路径
Linux命令中可以使用pwd查看当前目录,系统编程中可以通过getcwd获取当前目录。
| 所需头文件 | #include |
|---|---|
| 函数原型 | char getcwd(char buf, size_t size); |
| 函数参数 | *buf:保存当前目录的缓冲区 size:在现代linux 中,buf 的长度至少可以为255 字节 |
| 函数返回值 | 成功返回指向当前目录的指针,和buf 的值一样 错误返回NULL |
| 所需头文件 | #include |
|---|---|
| 函数原型 | char *get_current_dir_name(void); |
| 函数参数 | 无 |
| 函数返回值 | 成功返回指向当前目录的指针 错误返回NULL |
#include <stdio.h>
/*getcwd、getwd和get_current_dir_name函数的头文件*/
#define __USE_GNU
#include <unistd.h>
#define LENTH 255
int main()
{
char pwd[LENTH];
char *wd;
//getcwd函数测试
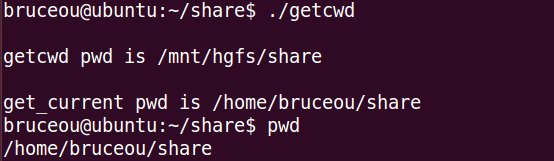
if(!getcwd(pwd,LENTH)){
perror("getcwd");
return 1;
}
printf("\ngetcwd pwd is %s\n",pwd);
//get_current_dir_name函数测试
wd = get_current_dir_name();
if(!wd)
{
perror("getcwd");
return 1;
}
printf("\nget_current pwd is %s\n",wd);
return 0;
}结果如下所示:
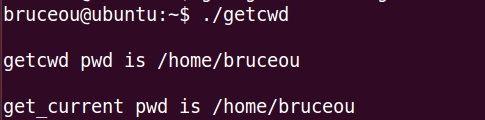
我们通过pwd查看当前路径。

值得注意的是如果在链接文件中getpwd能获得被链接文件路径,而get_current_pwd与pwd命令都是获得当前的路径。
目录切换
我们可以使用chdir函数组改变路径。
| 所需头文件 | #include |
|---|---|
| 函数原型 | int chdir(const char *path); |
| 函数参数 | path:文件当前路径 |
| 函数返回值 | 成功返回0 错误返回-1 |
| 所需头文件 | #include |
|---|---|
| 函数原型 | int fchdir(int fd); |
| 函数参数 | fd:文件描述符 |
| 函数返回值 | 成功返回0 错误返回-1 |
#include <stdio.h>
#include <sys/types.h>
#include <sys/stat.h>
#include <fcntl.h>
#include <unistd.h>
#define LENTH 255
int main(int argc,char *argv[])
{
int ret;
char pwd[LENTH];
//检测参数
if(argc <3)
{
printf("\nPlease input file path\n");
return 1;
}
//getcwd函数获取当前目录
if(!getcwd(pwd,LENTH))
{
perror("getcwd");
return 1;
}
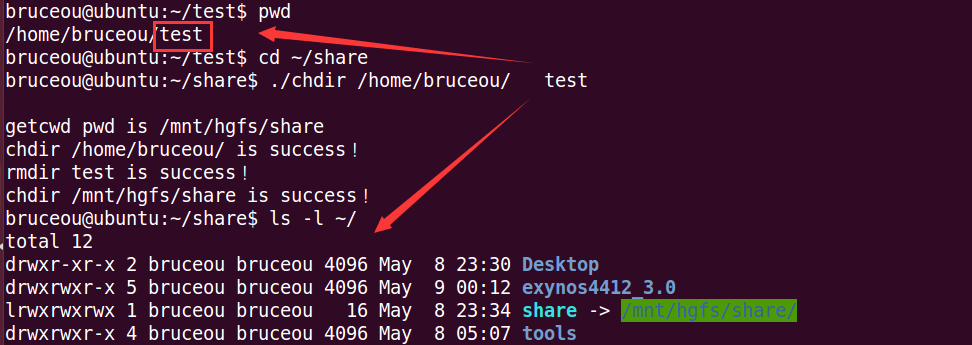
printf("\ngetcwd pwd is %s\n",pwd);
//使用chdir函数转入其他目录
ret = chdir(argv[1]);
if(ret)
{
printf("Please make sure file path\n");
return 1;
}
printf("chdir %s is success!\n",argv[1]);
//转入其他目录,完成操作
//使用rmdir函数删除目录
ret = rmdir(argv[2]);
if(ret<0)
{
printf("rmdir %s failed!\n",argv[2]);
return 1;
}
printf("rmdir %s is success!\n",argv[2]);
//再次使用chdir回到pwd保存的目录
ret = chdir(pwd);
if(ret)
{
printf("Please make sure file path\n");
return 1;
}
printf("chdir %s is success!\n",pwd);
return 0;
}结果如下所示:
3.3.5 opendir和closedir目录
前面介绍open和close函数用于打开关闭文件,这里介绍的opendir和closedir用于打开目录,相当于ls命令。
| 所需头文件 | #include <sys/types.h> #include |
|---|---|
| 函数原型 | DIR opendir(const char name); |
| 函数参数 | name:目录的路径 |
| 函数返回值 | 成功返回指向目录流的指针 错误返回NULL |
| 所需头文件 | #include <sys/types.h> #include |
|---|---|
| 函数原型 | int closedir(DIR *dirp); |
| 函数参数 | dirp:opendir 返回的dir 指针 |
| 函数返回值 | 成功返回0 失败返回-1 |
#include <stdio.h>
#include <dirent.h>
#include <sys/types.h>

int main(int argc,char *argv[])
{
    int ret;
    DIR *dir;

    //检测参数
    if(argc <2)
    {
        printf("\nPlease input file path\n");
        return 1;
    }

    //使用opendir函数打开目录
    dir = opendir(argv[1]);
    if(dir==NULL)
    {
        printf("opendir %s failed!\n",argv[1]);
        return 1;
    }
    printf("opendir %s suceces!\n",argv[1]);

    //使用closedir函数关闭目录
    closedir(dir);

    return 0;
}
结果如下所示:

3.3.6读取目录
在前面使用opendir打开目录的基础上,可以使用readdir读取目录信息。
| 所需头文件 | #include |
|---|---|
| 函数原型 | struct dirent readdir(DIR dirp); |
| 函数参数 | dirp:opendir 函数打开目录后返回的文件指针 |
| 函数返回值 | 成功返回指向dirp 的指针dirent 错误返回NULL |
#include <stdio.h>
#include <dirent.h>
#include <sys/types.h>

int main(int argc,char *argv[])
{
    int ret;
    DIR *dir;
    struct dirent *catlog;
    //检测参数
    if(argc <2)
    {
        printf("\nPlease input file path\n");
        return 1;
    }

    //使用opendir函数打开目录
    dir = opendir(argv[1]);
    if(dir==NULL)
    {
        printf("opendir %s failed!\n",argv[1]);
        return 1;
    }
    printf("opendir %s suceces!\n",argv[1]);

    //使用readdir读取目录argv[1]
    catlog = readdir(dir);
    if(catlog == NULL)
    {
        printf("readdir %s failed!\n",argv[1]);
        return 1;
    }
    printf("%s d_ino is %ld\n ",argv[1],catlog->d_ino);

    //使用closedir函数关闭目录
    closedir(dir);

    return 0;
}
结果如下所示:

3.3.7目录链接
硬链接
我们可以使用ln进行硬链接,下面我们要讲解的是link函数。
| 所需头文件 | #include |
|---|---|
| 函数原型 | int link(const char oldpath, const char newpath); |
| 函数参数 | oldpath:已有的文件路径。 newpath:新建的硬链接文件路径。 |
| 函数返回值 | 成功返回0 错误返回-1 |
#include <stdio.h>
#include <unistd.h>

int main(int argc,char *argv[])
{
    int ret;

    if(argc <3)
    {
        printf("\nPlease input file path\n");
        return 1;
    }

    //测试link函数
    ret = link(argv[1],argv[2]);
    if(ret)
    {
        printf("link failed");
        return 1;
    }
    printf("link %s to %s success!\n",argv[1],argv[2]);

    return 0;
}
结果如下所示:

linktest.txt是新建的文件,linktest是连接后的文件。打开linktest文件可以发现和linktest.txt内容一样。linktest和linktest.txt索引信息也是一样的。
符号链接
符号链接也叫软链接,可以使用symlink函数进行软链接。
| 所需头文件 | #include |
|---|---|
| 函数原型 | int symlink(const char oldpath, const char newpath); |
| 函数参数 | oldpath:已有的文件路径。 newpath:新建的硬链接文件路径。 |
| 函数返回值 | 成功返回0 错误返回-1 |
#include <stdio.h>
#include <unistd.h>

int main(int argc,char *argv[])
{
    int ret;

    if(argc <3)
    {
        printf("\nPlease input file path\n");
        return 1;
    }

    //测试symlink函数
    ret = symlink(argv[1],argv[2]);
    if(ret)
    {
        printf("symlink failed");
        return 1;
    }
    printf("symlink %s to %s success!\n",argv[1],argv[2]);

    return 0;
}
结果如下所示:

我们可以发现symlinktest.txt和symlinktest的索引信息不一样。那么硬链接和软连接有啥其他区别呢?其实硬链接就是给文件重名了,而软连接就是是一个快捷方式。
解除链接
前面使用函数进行了硬链接和软链接,接下我们使用unlink函数来解除链接。
| 所需头文件 | #include |
|---|---|
| 函数原型 | int unlink(const char *pathname); |
| 函数参数 | pathname:链接文件的路径 |
| 函数返回值 | 成功返回0 错误返回-1 |
【注】unlink指向软链接,删除软链接;指向最后一个硬链接,相当于删除文件。
#include <stdio.h>
#include <unistd.h>

int main(int argc,char *argv[])
{
    int ret;

    if(argc <2)
    {
        printf("\nPlease input file path\n");
        return 1;
    }

    //测试unlink函数
    ret = unlink(argv[1]);
    if(ret)
    {
        printf("unlink failed");
        return 1;
    }
    printf("unlink %s is success!\n",argv[1]);

    return 0;
}
3.3.8移动或重命名文件及目录
移动文件或重命名文件命令为mv,函数为rename。
| 所需头文件 | #include |
|---|---|
| 函数原型 | int rename(const char oldpath, const char newpath) |
| 函数参数 | oldpath:旧的文件路径 newpath:新的文件路径 |
| 函数返回值 | 成功返回0 错误返回-1 |
#include <stdio.h>
#include <sys/types.h>
#include <sys/stat.h>
#include <fcntl.h>
#include <unistd.h>
#include <string.h>

//argv[1] is oldpath ; argv[2] is newpath
int main(int argc,char *argv[])
{
    int ret;
    if(argc < 3)
    {
        printf("\nPlease input file path\n");
        return 1;
    }

    if(ret = rename(argv[1],argv[2]))
    {
        printf("\nerr\n");
    }

    printf("rename %s to %s success!\n",argv[1],argv[2]);
    return 0;
}
结果如下所示:
